Step by Step Instructions:
The following set of instructions show a sample JavaScript implementation in a Cognos8.2 environment, using the Cognos provided Go Sales and Retailers package. It was tested on IE 6.0 and IE 7.0. JavaScript will need to be upgraded for Cognos 8.3 and above.1. To get started, let’s create a simple list report with the following fields:

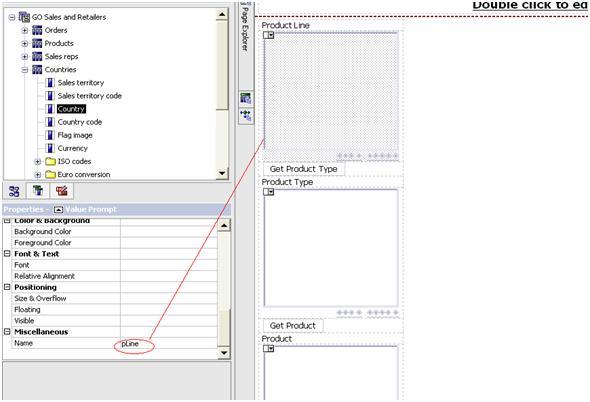
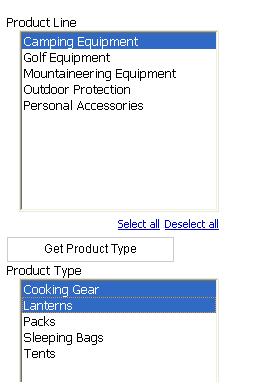
2. Create a prompt page with product line, product type and product as optional cascading value prompts; name each prompt object with name “pLine”, “pType” and “pProduct” respectively.
You will have the Product Type prompt cascaded by Product Line, and the Product prompt cascaded by Product Type.
Hint: to name each prompt object click on the object then on the right properties panel under Miscellaneous ->Name
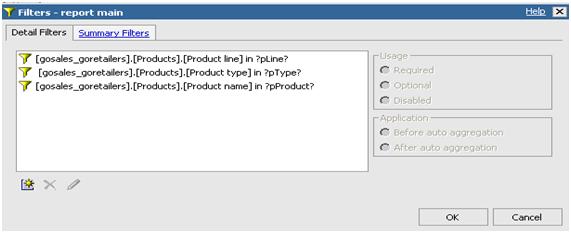
3. Add optional filters “ pLine, pType, pProduct” to the report query:
4. Test the report to make sure it is working correctly at this point
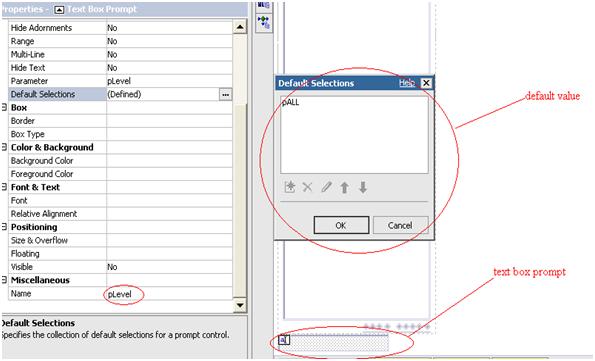
5. Add a new hidden text box prompt onto prompt page. Name it as “pLevel”, set default value to “pALL”. This text box prompt value will be used to determine the lowest prompt level that a user selects. When the user hits the customized “Finish” button” (see below) a JavaScript function will go through each prompt and dynamically set this hidden text box prompt value to the corresponding level the user has selected.
6. Delete “Finish” button on prompt page. Drag a new HTML item and create a new custom “Finish” button using the following HTML code:
<button type=”button” name=”finish99″ id=”finish99″ onclick=”assignParamValue()” style=”"
class=”bp” onmouseover=”" onmouseout=”" onkeypress=”return preventSubmitEvent(event);”>
Finish</button>
7. Add another HTML item onto prompt page and paste in the following JavaScript:
<script>
var f=document.forms["formWarpRequest"];
function assignParamValue()
{
var tmp=”";
if (f.elements["_oLstChoicespLine"])
{
if( f.elements["_oLstChoicespLine"].selectedIndex>=0 )
tmp=’pLine’;
}
if (f.elements["_oLstChoicespType"])
{
if( f.elements["_oLstChoicespType"].selectedIndex>=0)
tmp=’pType’;
}
if (f.elements["_oLstChoicespProduct"])
{
if( f.elements["_oLstChoicespProduct"].selectedIndex>=0)
tmp=’pProduct’;
}
if(tmp==”") tmp=’pALL’;
f.elements["_textEditBoxpLevel"].value = tmp;
//uncomment for debugging
//alert (‘Page set breaks by ‘+document.forms["formWarpRequest"].elements["_textEditBoxpLevel"].value);
promptButtonFinish(); //submit request
}
</script>
8. Now add a new data item to report query, name it as “pagebreak by”. Use the following expression:
if (?pLevel? =’pProduct’)
then ([gosales_goretailers].[Products].[Product name])
else if (?pLevel?=’pType’)
then ([gosales_goretailers].[Products].[Product type])
else if (?pLevel?=’pLine’)
then ([gosales_goretailers].[Products].[Product line])
else (‘ALL’)
9. Set up page breaking for the report and group it by the “pagebreak by “ data item you just created:

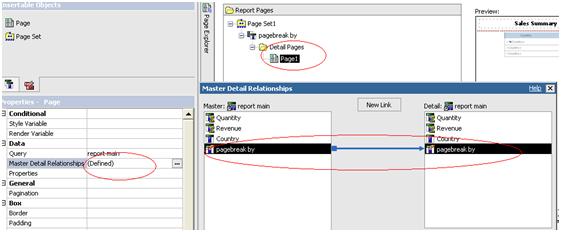
10. Click on Page1, then on Properties Panel click on “Master Detail Relationships”. Define the master detail relationship from “pagebreakby” to “pagebreakby”.
11. Go back to report page. Drag “pagebreak by” data item to report title area:
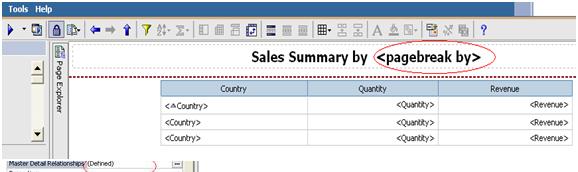
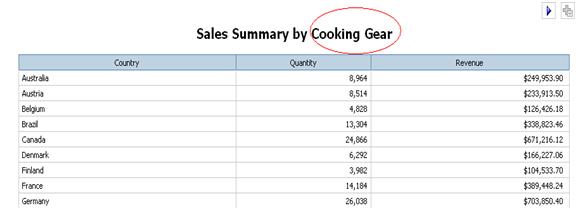
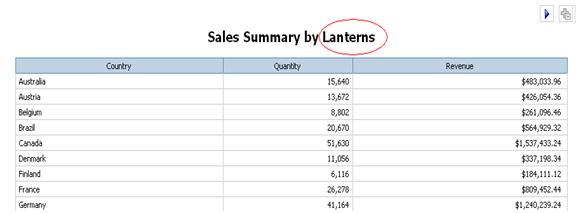
12. Run the report. If you select two product types then the report should return two pages. The report title should also dynamically change base on page break:
Prompt page:
Sample Report Page 1:
Sample Report Page 2:
Source :http://www.ironsidegroup.com/
October 27, 2009 by Susan Ma
No comments:
Post a Comment